Deepytorch Inference是阿里云自研的AI推理加速器,针对Torch模型,可提供显著的推理加速能力。本文主要介绍安装并使用Deepytorch Inference的操作方法,以及推理效果展示。
Deepytorch Inference通过调用deepytorch_inference.compile(model)接口即可实现推理性能加速。使用Deepytorch Inference前,您需要先使用torch.jit.script或者torch.jit.trace接口,将PyTorch模型转换为TorchScript模型,更多信息,请参见PyTorch官方文档。
本文将为您提供分别使用torch.jit.script和torch.jit.trace接口实现推理性能加速的示例,更多信息,请参见推理性能效果展示。
重要
安装Deepytorch Inference前,请确认您已创建配备了NVIDIA GPU卡的GPU实例(即A10、V100或T4 GPU)。
连接GPU实例后,使用pip工具安装指定版本的torch(例如2.0.1版本)和Deepytorch Inference软件包,其中,DeepyTorch Inference的软件包可以通过PyPI进行分发和安装,方便开发者通过简单的命令行工具安装和管理软件。
说明
如需选择特定版本的Deepytorch Inference软件包,则需从deepytorch inference中选择该版本的whl包。例如,需要python 3.8+pytorch 1.13+cuda 11.7版本的Deepytorch Inference软件包,则直接下载deepytorch_inference(python 3.8+pt 1.13.1+cuda 117)即可。
pip install torch==2.0.1 deepytorch-inference -f https://aiacc-inference-public-v2.oss-cn-hangzhou.aliyuncs.com/aiacc-inference-torch/stable-diffusion/aiacctorch_stable-diffusion.html
您仅需要在模型的推理脚本中增加如下代码,即可启用Deepytorch Inference的推理优化功能,增加的代码如下所示:
import deepytorch_inference # 导入deepytorch_inference软件包
deepytorch_inference.compile(mod_jit) # 进行编译
基于不同模型,为您展示使用Deepytorch Inference的推理性能效果,实际的推理加速效果与模型、GPU机型等因素有关,本文以A10机型(例如gn7i、ebmgn7i或ebmgn7ix)为例进行推理测试。关于模型支持情况,请参见模型支持情况。
以下示例将基于ResNet50模型,并调用torch.jit.script接口执行推理任务,执行1000次后取平均时间,将推理耗时从3.686 ms降低至0.396 ms以内。
原始版本
原始代码如下所示:
import timeimport torchimport torchvision.models as models
mod = models.resnet50(pretrained=True).eval()
mod_jit = torch.jit.script(mod)
mod_jit = mod_jit.cuda()

in_t = torch.randn([1, 3, 224, 224]).float().cuda()# Warming upfor _ in range(10):
    mod_jit(in_t)

inference_count = 1000# inference teststart = time.time()for _ in range(inference_count):
    mod_jit(in_t)
end = time.time()print(f"use {(end-start)/inference_count*1000} ms each inference")print(f"{inference_count/(end-start)} step/s")执行结果如下,显示推理耗时大约为3.686 ms。

加速版本
仅需要在原始版本代码中插入如下代码即可实现推理性能加速:
更新后的代码如下:
import timeimport deepytorch_inference  # 导入deepytorch_inference软件包import torchimport torchvision.models as models
mod = models.resnet50(pretrained=True).eval()
mod_jit = torch.jit.script(mod)
mod_jit = mod_jit.cuda()
mod_jit = deepytorch_inference.compile(mod_jit)  # 进行编译in_t = torch.randn([1, 3, 224, 224]).float().cuda()# Warming upfor _ in range(10):
    mod_jit(in_t)

inference_count = 1000# inference teststart = time.time()for _ in range(inference_count):
    mod_jit(in_t)
end = time.time()print(f"use {(end-start)/inference_count*1000} ms each inference")print(f"{inference_count/(end-start)} step/s")执行结果如下,显示推理耗时为0.396 ms。相较于之前的3.686 ms,推理性能有了显著提升。

import deepytorch_inference
deepytorch_inference.compile(mod_jit)
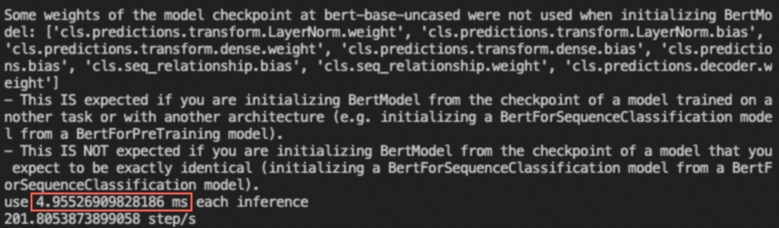
以下示例将基于Bert-Base模型,并调用torch.jit.trace接口执行推理任务,将推理耗时从4.955 ms降低至0.418 ms以内。
执行以下命令,安装transformers包。
pip install transformers
分别运行原始版本和加速版本的Demo,并查看运行结果。
import deepytorch_inference
deepytorch_inference.compile(traced_model)
原始版本
原始代码如下所示:
from transformers import BertModel, BertTokenizer, BertConfigimport torchimport time

enc = BertTokenizer.from_pretrained("bert-base-uncased")# Tokenizing input texttext = "[CLS] Who was Jim Henson ? [SEP] Jim Henson was a puppeteer [SEP]"tokenized_text = enc.tokenize(text)# Masking one of the input tokensmasked_index = 8tokenized_text[masked_index] = '[MASK]'indexed_tokens = enc.convert_tokens_to_ids(tokenized_text)
segments_ids = [1, 1, 1, 1, 1, 1, 1, 0, 0, 0, 0, 0, 0, 0, ]# Creating a dummy inputtokens_tensor = torch.tensor([indexed_tokens]).cuda()
segments_tensors = torch.tensor([segments_ids]).cuda()
dummy_input = [tokens_tensor, segments_tensors]# Initializing the model with the torchscript flag# Flag set to True even though it is not necessary as this model does not have an LM Head.config = BertConfig(vocab_size_or_config_json_file=32000, hidden_size=768,
    num_hidden_layers=12, num_attention_heads=12, intermediate_size=3072, torchscript=True)# Instantiating the modelmodel = BertModel(config)# The model needs to be in evaluation modemodel.eval()# If you are instantiating the model with `from_pretrained` you can also easily set the TorchScript flagmodel = BertModel.from_pretrained("bert-base-uncased", torchscript=True)

model = model.eval().cuda()# Creating the tracetraced_model = torch.jit.trace(model, dummy_input)# Warming upfor _ in range(10):
    all_encoder_layers, pooled_output = traced_model(*dummy_input)

inference_count = 1000# inference teststart = time.time()for _ in range(inference_count):
    traced_model(*dummy_input)
end = time.time()print(f"use {(end-start)/inference_count*1000} ms each inference")print(f"{inference_count/(end-start)} step/s")执行结果如下,显示推理耗时大约为4.955 ms。
加速版本
仅需要在原始版本代码中插入如下代码即可实现推理性能加速:
更新后的代码如下:
from transformers import BertModel, BertTokenizer, BertConfigimport torchimport deepytorch_inference  # 导入deepytorch-inference软件包import time

enc = BertTokenizer.from_pretrained("bert-base-uncased")# Tokenizing input texttext = "[CLS] Who was Jim Henson ? [SEP] Jim Henson was a puppeteer [SEP]"tokenized_text = enc.tokenize(text)# Masking one of the input tokensmasked_index = 8tokenized_text[masked_index] = '[MASK]'indexed_tokens = enc.convert_tokens_to_ids(tokenized_text)
segments_ids = [1, 1, 1, 1, 1, 1, 1, 0, 0, 0, 0, 0, 0, 0, ]# Creating a dummy inputtokens_tensor = torch.tensor([indexed_tokens]).cuda()
segments_tensors = torch.tensor([segments_ids]).cuda()
dummy_input = [tokens_tensor, segments_tensors]# Initializing the model with the torchscript flag# Flag set to True even though it is not necessary as this model does not have an LM Head.config = BertConfig(vocab_size_or_config_json_file=32000, hidden_size=768,
   num_hidden_layers=12, num_attention_heads=12, intermediate_size=3072, torchscript=True)# Instantiating the modelmodel = BertModel(config)# The model needs to be in evaluation modemodel.eval()# If you are instantiating the model with `from_pretrained` you can also easily set the TorchScript flagmodel = BertModel.from_pretrained("bert-base-uncased", torchscript=True)

model = model.eval().cuda()# Creating the tracetraced_model = torch.jit.trace(model, dummy_input)
traced_model = deepytorch_inference.compile(traced_model)  # 进行编译# Warming upfor _ in range(10):
    all_encoder_layers, pooled_output = traced_model(*dummy_input)

inference_count = 1000# inference teststart = time.time()for _ in range(inference_count):
    traced_model(*dummy_input)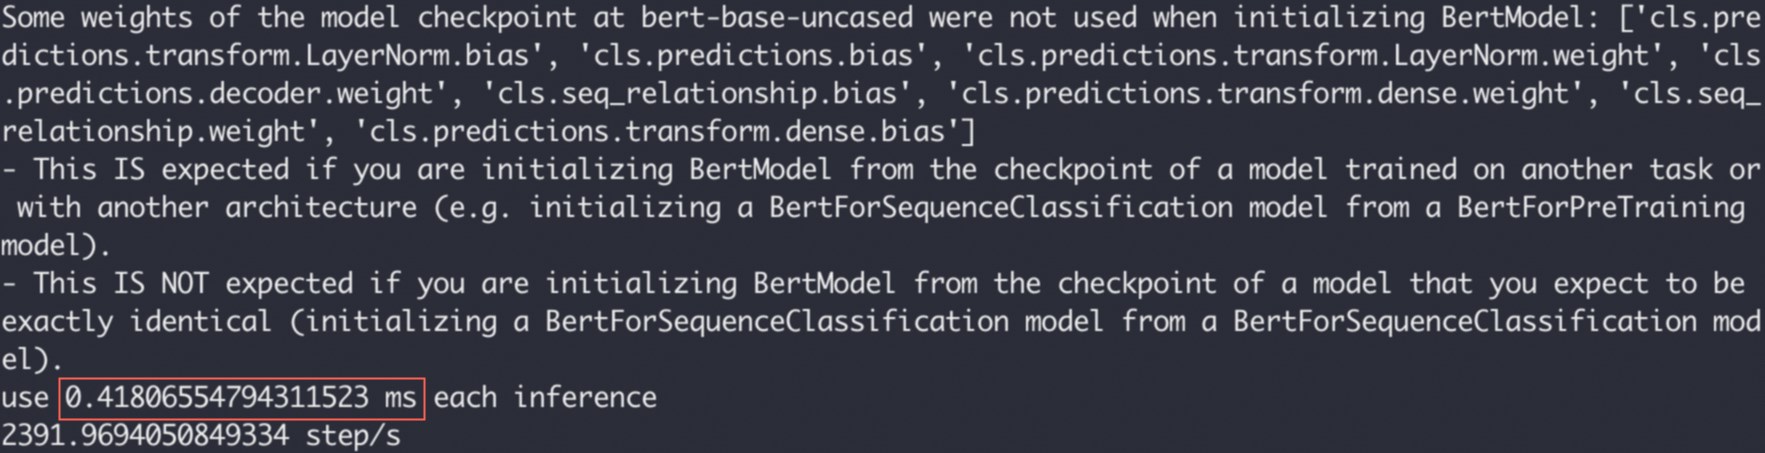
end = time.time()print(f"use {(end-start)/inference_count*1000} ms each inference")print(f"{inference_count/(end-start)} step/s")执行结果如下,显示推理耗时为0.418 ms。相较于之前的4.955 ms,推理性能有了显著提升。
在Deepytorch Inference中,您无需关心动态尺寸的问题,Deepytorch Inference能够支持不同的输入尺寸。以下示例基于ResNet50模型,输入3个不同的长宽尺寸,带您体验使用Deepytorch Inference进行推理加速的过程。
import timeimport torchimport deepytorch_inference  # 导入deepytorch-inference软件包import torchvision.models as models
mod = models.resnet50(pretrained=True).eval()
mod_jit = torch.jit.script(mod)
mod_jit = mod_jit.cuda()
mod_jit = deepytorch_inference.compile(mod_jit)  # 进行编译in_t = torch.randn([1, 3, 224, 224]).float().cuda()
in_2t = torch.randn([1, 3, 448, 448]).float().cuda()
in_3t = torch.randn([16, 3, 640, 640]).float().cuda()# Warming upfor _ in range(10):
    mod_jit(in_t)
    mod_jit(in_3t)

inference_count = 1000# inference teststart = time.time()for _ in range(inference_count):
    mod_jit(in_t)
    mod_jit(in_2t)
    mod_jit(in_3t)
end = time.time()print(f"use {(end-start)/(inference_count*3)*1000} ms each inference")print(f"{inference_count/(end-start)} step/s")执行结果如下,显示推理耗时大约为9.85 ms。

说明
为了缩短模型编译的时间,应在warming up阶段推理最大及最小的tensor尺寸,避免在执行时重复编译。例如,已知推理尺寸在1×3×224×224至16×3×640×640之间时,应在warming up时推理这两个尺寸。